A domain controller significantly simplifies the administration effort even in small environments with only a few Windows computers and allows users to log on and access data across devices. Samba4 on Debian is an alternative to the classic Windows server with Active Directory role. Debian uses far fewer resources than Windows Server and certainly runs more reliably. Samba4 offers the same range of functions and, thanks to full compatibility with the Microsoft implementation, it can also be managed with the Remote Server Administration Tools (RSAT) from any Windows client in the domain.
Setup
In this tutorial, Debian 11.3 and Samba 4.13.13-Debian are used. First, a virtual machine is set up for the new domain controller. Here, 8 GB RAM and 240 GB storage space are already sufficient for a small environment with 20 users and file storage on an external NAS. Then Debian is installed in the minimal version without GUI.
Set network and hostname
Our new domain controller is operated behind a router (Unifi UDM Pro). The domain controller therefore has a static IP address which is distributed to the clients via the router’s DHCP server as the primary DNS server. This is necessary so that clients can later resolve the names of DC and other clients. In addition, the SSH port is changed and the host name is set. For the domain name, “.local” should not be used as extension. I therefore use “.lan”.
nano /etc/network/interfaces
allow-hotplug eth0
iface eth0 inet static
address 192.168.40.254
gateway 192.168.40.1

nano /etc/ssh/sshd_config
Port 44022

nano /etc/hostname
dc.abc.lan

nano /etc/hosts
dc.abc.lan dc
Install packages and set up Samba4
In addition to Samba4, an NTP server is also installed in this step. This ensures that DC and clients use the same time. Otherwise, no login is possible in case of differences in the system times.
apt-get install ntpdate ntp sudo
sudo ntpdate -bu pool.ntp.org


apt-get install acl attr samba samba-dsdb-modules samba-vfs-modules winbind dnsutils
cd /etc/samba && mv smb.conf smb.conf.orig
Now Samba4 is set up. I use the wizard to create a new smb.conf. Below are the parameters for the wizard.
samba-tool domain provision --use-rfc2307 --interactive
Realm ABC.LAN
Domain: ABC
Server Role: dc
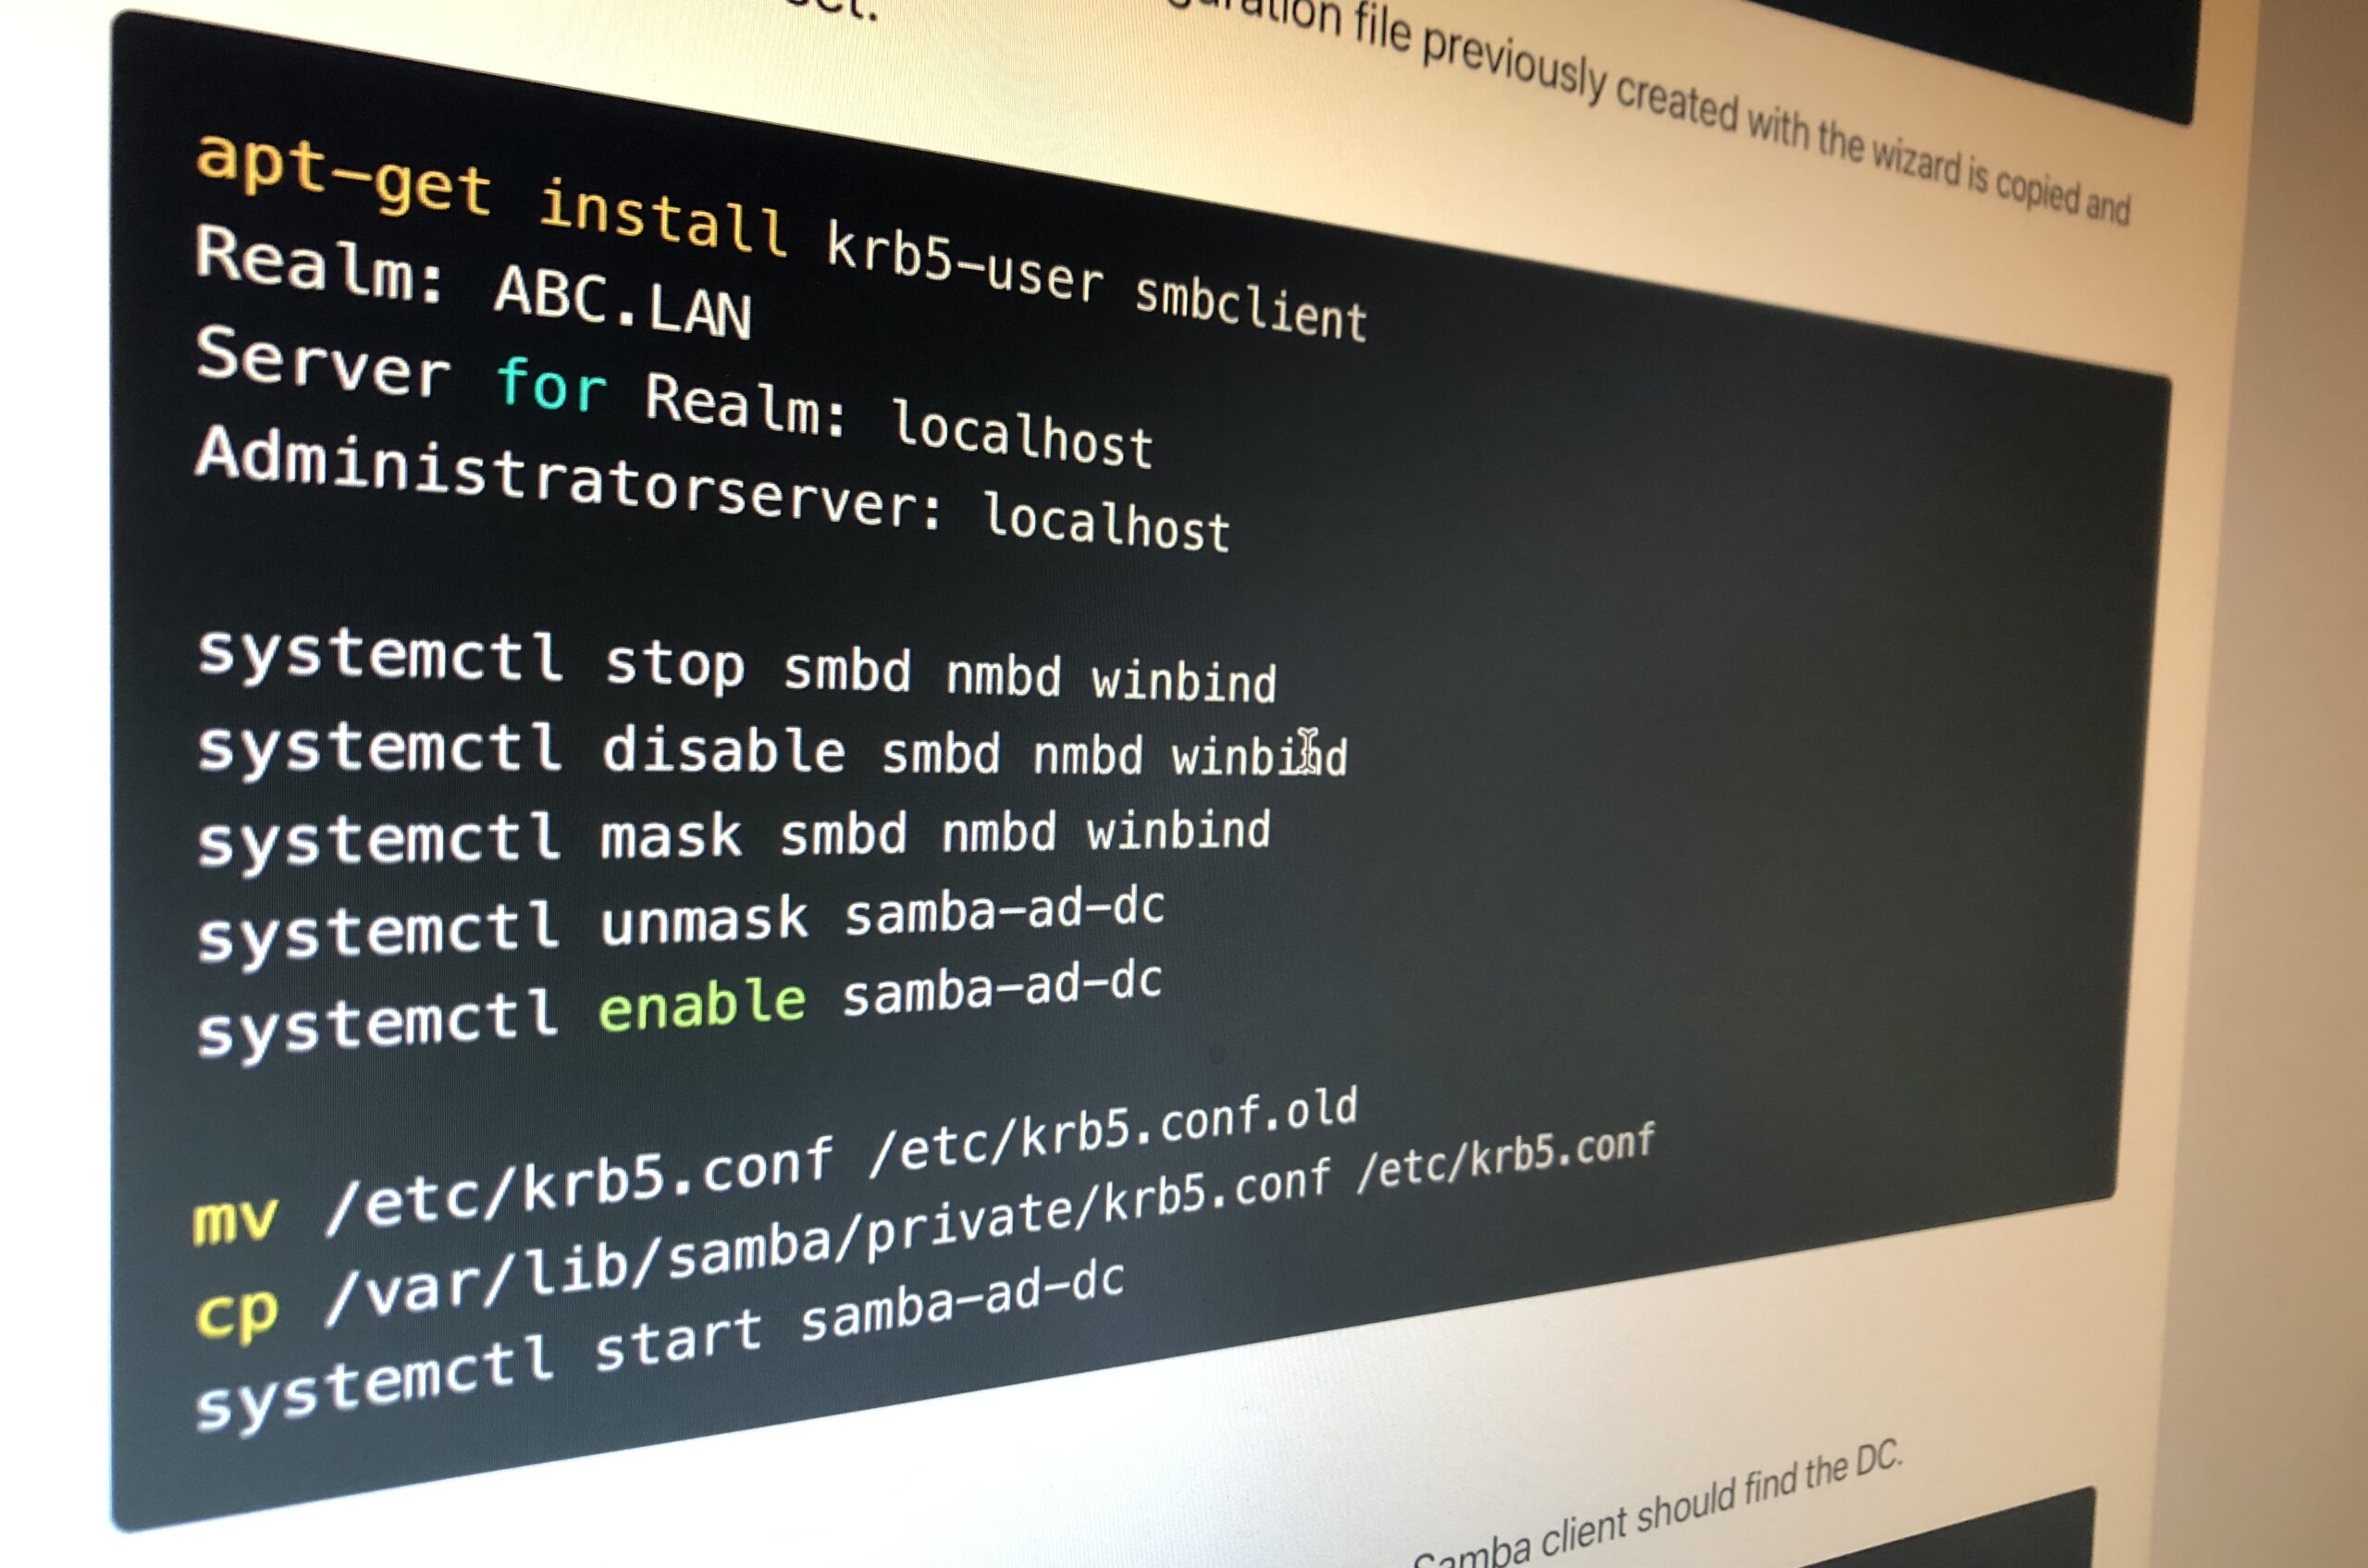
DNS Backend: Samba InternalThen Kerberos is installed, the configuration file previously created with the wizard is copied and automatic startup is set.
apt-get install krb5-user smbclient
Realm: ABC.LAN
Server for Realm: localhost
Administratorserver: localhost

systemctl stop smbd nmbd winbind
systemctl disable smbd nmbd winbind
systemctl mask smbd nmbd winbind
systemctl unmask samba-ad-dc
systemctl enable samba-ad-dc

mv /etc/krb5.conf /etc/krb5.conf.old
cp /var/lib/samba/private/krb5.conf /etc/krb5.conf
systemctl start samba-ad-dc
First Test
If everything went successfully up to this point, the Samba client should find the DC.
smbclient -L localhost -U%Adjust network configuration
Since the server itself should also resolve addresses via the local Samba DNS server, we also adjust the hosts and resolv.conf. The additional line in ntp.conf is to avoid problems with the deviation of the virtual machine clock from the hardware time.
nano /etc/hosts
127.0.0.1     localhost
192.168.40.254     dc.abc.lan    dc


nano /etc/resolv.conf
domain abc.lan
search abc.lan
nameserver 192.168.40.254


nano  /etc/ntp.conf
tinker panic 0
Final Samba4 configuration
Save user profiles on server
For the server-stored profiles, we first create a folder and add a share for it. Then we adjust the permissions and configure the folder so that it is no longer searchable for the users.
mkdir -p /srv/samba/profiles/
net rpc rights grant "ABC\Administrator" SeDiskOperatorPrivilege -U "ABC\administrator"
nano /etc/samba/smb.conf
[profiles]
comment = Benutzerprofile
path = /srv/samba/profiles/
browseable = Yes
read only = No
csc policy = disable
vfs objects = acl_xattr
chmod 1770 /srv/samba/profiles/
samba-tool ntacl get --as-sddl /var/lib/samba/sysvol/abc.lan/scripts/
output:
O:LAG:BAD:P(A;OICI;0x001f01ff;;;BA)(A;OICI;0x001200a9;;;SO)(A;OICI;0x001f01ff;;;SY)(A;OICI;0x001200a9;;;AU)
samba-tool ntacl set "O:LAG:BAD:P(A;OICI;0x001f01ff;;;BA)(A;OICI;0x001200a9;;;SO)(A;OICI;0x001f01ff;;;SY)(A;OICI;0x001200a9;;;AU)" /srv/samba/profiles/
systemctl restart samba-ad-dc
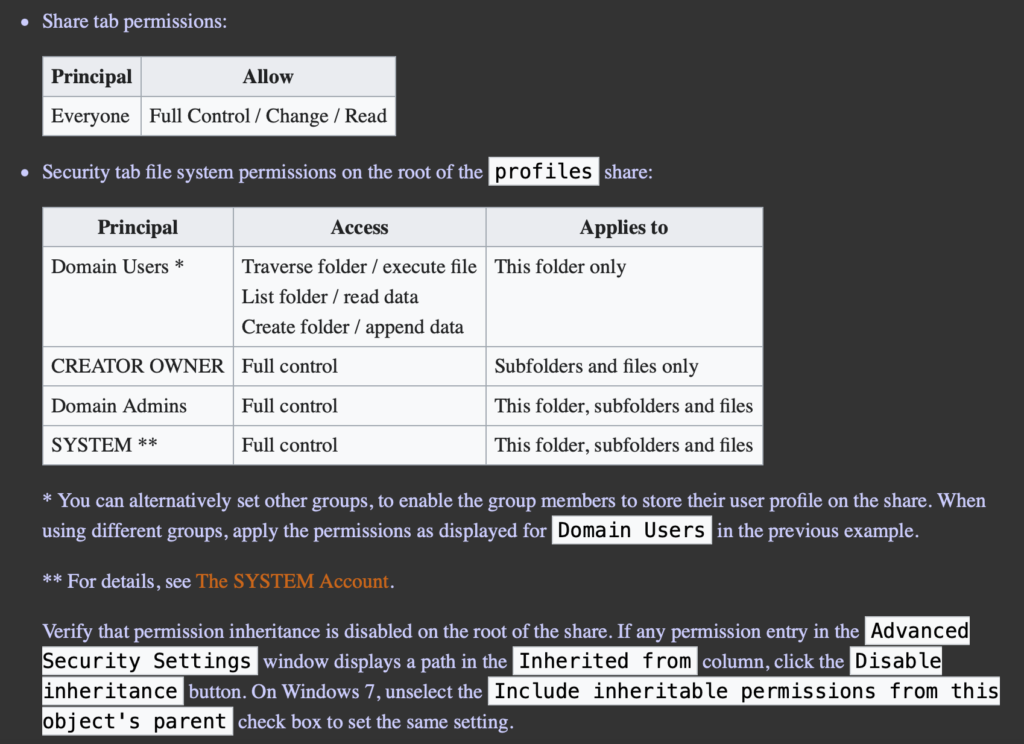
smbcontrol all reload-config Now the first Windows client should join the domain. To do this, open Settings – System – Info – Rename this PC (advanced) and join the domain. After the machine restarts, it should be possible to log in with user “ABC\Administrator”. Now open the computer administration and connect to server “DC”. There edit the share “profiles” and set the following rights:
Finally, the smb.conf is edited once again and the searchable attribute is removed from the profile folder.
nano /etc/samba/smb.conf
[profiles]
...
         browseable = No
...
Create group policy
The group policy specifies settings. It is possible to apply group policy objects for all users of a group, individual users or computers, or rule-based. Basically, every Windows setting can be adjusted via the group policy. Here, the profile path should be set for all users so that the server-stored profiles work. Also, network drives from an external NAS can be mounted for different users via Group Policy. The group policy can be edited by any Windows client within the domain via Group Policy Management. To install, start the command prompt (cmd) on the Windows client as an administrator and run the following command:
dism /online /add-capability /CapabilityName:Rsat.GroupPolicy.Management.Tools~~~~0.0.1.0 /CapabilityName:Rsat.Dns.Tools~~~~0.0.1.0 /CapabilityName:Rsat.ActiveDirectory.DS-LDS.Tools~~~~0.0.1.0Then, by entering “Group Policy Management” in the search, we can start the application. After right-clicking on “abc.lan” we create a new group policy object. We navigate along the path Computer Configuration → Policies → Administrative Templates → System → User Profiles → Set roaming profile path for all users logging onto this computer. Here we set \dc\profiles\%USERNAME%.
Changes to the group policy can be applied with gpupdate /force or a computer restart.
Next steps
Additional users and groups can be added to the domain via the Active Directory Users and Computers application. Finally, all computers on the network should join the domain as described above.